Sharing ePortfolio Artefacts with Individuals
ePortfolio is a tool that allows you to represent your learning by creating, organising and sharing your artefacts, which may include presentations and portfolios, documents, audio, video files and more. Sharing with others is useful if you want them to view, comment, or co-edit your work. You can also encourage sharing as part of informal feedback or peer review with your students. This guide outlines how staff can share their artefacts created within eportfolio with individuals (VU internal and external people). As opposed to ‘pushing’, by sharing, you can work on the same artefacts with certain permissions associated.
The video below explains how to create sharing groups and share artefacts with individuals.
This guide will cover:
How to share artefacts with VU staff and students
How to share presentations with external people
How to share artefacts publicly to others
Note: This guide assumes you have already created artefacts, if not, Creating Artefacts in ePortfolio
How to Share Artefacts with VU Staff and Students
After creating artefacts, you can share them with other teaching staff and students within VU. For this example, we're using a presentation. For instructions, see Creating an ePortfolio Presentation.
1. Locating Items to Share
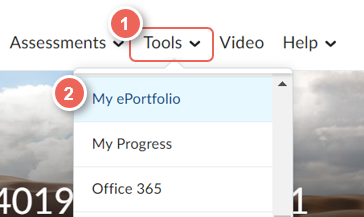
Find the ePortfolio item (in this case, a presentation) you wish to share, either via the ePortfolio tab, or by going to the My Items tab.
1.1. Click on the drop-down arrow next to the title of the artefact.
1.2. Click Share, This will then open a new window.
2. Sharing Artefacts with VU Staff and Students
2.1. Click on Show Display Options.
It allows you to choose how long others can view or access the artefact. You can choose to allow others to only view the artefact for specific dates, or have unlimited access (Always Visible)
2.2. To add people to share with, click on Add Users and Groups.
3. Searching and Adding Staff and Students
3.1. After clicking Add Users and Groups, search for others by typing in their names.
3.2. Once you ensure that the chosen name appears under the Selected Users, assign appropriate permissions under the Assign Permissions section. This will restrict certain functions that the people can perform with the shared artefact. These include the capacity to:
See comments from others, Add comments, See assessments from others, Add assessments, and Edit. Then click Share.
4. Sending the Invitations for Individuals
You can see now the selected user is listed .
To send an email invitation to share the artefact with the selected user,
4.1. Choose the users by ticking the boxes on the left.
4.2. Click on Send Invite. This will take you to a new window, allowing you to write a message and send an invitation email to the selected users for sharing the artefact. You can also send a copy invite to yourself.
Note: From the pencil icon on the right, you can re-edit the permissions assigned to the user. Also from the
red cross icon, you can delete the selected user not to share the artefact anymore.
How to Share Presentations with External People
Similarly to the sharing of artefacts with VU people internally, you can share presentations with external people as long as you have their email addresses, or can share with a larger audience publicly by sharing a web address (URL).
Note: You cannot share any other type of artefacts with external individuals.
1. Locating the Presentation Sharing List
1.1 From the Sharing Settings option, click Add Users and Groups.
2. Searching and Adding Users and Groups
In the Sharing Settings page, instead of searching for and choosing an existing VU member,
2.1. Type in any email addresses with which you would like to share the artefact under External Email Address, and click Add.
2.2. Once the emails are added to the Selected Users, make sure to assign certain permissions.
2.3. Click Share.
3. Sending the Invitations for Users and Groups
3.1. Once selected users appear in the list, choose the users by ticking the boxes on the left and click Send Invite.
4. Writing an Email With Invitation (Optional)
This opens a new window for you to write an invitation email.
Optionally, you can send a copy of the invitation message to yourself by ticking the box under Copy Invite.
5. Confirmation
The external people you have shared with will receive an invite message telling them they have access to your artefact, and provide them with a link where they can set up a temporary account.
Note: If sharing with other external viewers, they will only get the ability to access the link and view the artefact for 3 days, from the time the email is sent.
How to Publicly Share Artefacts to Others
If you need to share your presentation more widely, because you wish to present your work to a large group of people or keep it open for an extended period of time, then you can use the public web link.
Note: this option only works for presentations (not other artefacts).
To share the artefact publicly,
1. In the Sharing Settings option, tick on the Public Access option.
2. This will allow anyone to access the artefact outside the VU Collaborate.
3. Click Save.
Note: the URL provided in this section can be sent to and shared with anyone as a link to the artefact.
Further Support
Visit the VU Collaborate Help site at https://vucollaboratehelp.vu.edu.au for up to date information and resources on blended learning or email This email address is being protected from spambots. You need JavaScript enabled to view it..
Contact ITS Service Desk on (03) 9919 2777 or via self-service http://servicedesk.vu.edu.au for further technical support.