Creating Artefacts in ePortfolio
My ePortfolio is a repository for digital artefacts that represent your learning. You may upload or create artefacts on any number of topics and at any stage of completion. An artefact may be a document, graphic, audio file, video file, presentation, or other forms of digital media. You may upload files from a personal computer or storage device; import items from a unit; link to a website; create an HTML file; fill out a form created by your institution, or record an audio file directly within My ePortfolio.
Instead of viewing your artefacts as complete examples, consider them as ongoing projects and continuously revise them as you develop new skills and understandings. This way your portfolio is a true reflection of your skills and achievements.
Here are the steps to create artefacts in ePortfolio:
- Locating ePortfolio
- Upload a File
- Create an HTML File
- Link to a Web Address
- Import Unit Content as an Artefact
- Record Audio
Step One: Locating ePortfolio
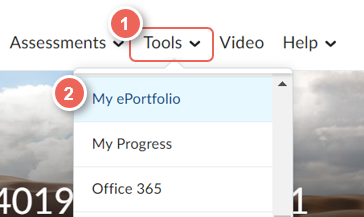
1. To access the ePortfolio, click Tools (or Toolbox) in the main navbar in your space.
2. A drop-down menu will appear. Click on My ePortfolio.
Step Two: Upload a File
Upload files from your computer, personal storage device, or VU Collaborate locker area that demonstrate your improvement or mastery in an area of interest.
1. Click My Items tab, then click Add button.
2. Click File from Computer.
3. A pop-up window will appear, select the location of your file either from your Computer or VU Collaborate personal or group lockers.
4. If you wish to upload a file, click on My Computer then click on Upload to select the file.
5. A pop-up window will appear, browse for the file you want to add, select the file and click Open.
6. Click Add.
6. Give the file a Name and Description. Add any Tags you want the artefact to have.
7. Click Save.
8. Click on Save and Close.
You're file is now uploaded onto your ePortfolio.
Tip: Consider compressing large media files before you upload them to save unit/course in your My ePortfolio. Full resolution files are not usually necessary for display on the web.
Note: Tags are words you associate with an object to make items easier to find. You can search for items with specific tags, and other users can use your tags to search for items.
Step Three: Create an HTML File
My ePortfolio provides the option to create HTML artefacts using a simple HTML Editor. HTML files may contain formatted text, images, videos, audio files, and links to content in VU Collaborate.
1. Click Web Document from the Add button.
2. Enter the File Name you want the file to be stored as.
3. Use the HTML Editor to add your content.
4. Click Next.
5. Enter the Name you want to display for the file and a Description. Add any Tags you want the artefact to have.
6. Click Save.
7. Click on Save and Close.
Your Web Document is now created in your ePortfolio.
Step Four: Link to a Web Address
If you want to include an existing website as an artefact in your portfolio, you can reference the address (URL) for the site rather than uploading files.
1. Click Link from the Add Button.
2. Enter the Name you want the URL to be stored as.
3. Enter the URL (web address).
4. Enter a Description of the site or its significance.
5. Add any Tags you want the artefact to have.
6. Click Save.
7. Click on Save and Close.
Your link is now created in your ePortfolio.
Step Five: Import Unit Content as an Artefact
Track your progress over time by including your unit work in your My ePortfolio. You may then review your work at any point in the future and compare it to other assignments and units. You can also add unit content artefacts to your My ePortfolio directly from your units.
Note: If you import quiz or assessment dropbox folder results into your My ePortfolio, any learning objectives associated with the quiz or assessment dropbox folder also import into your My ePortfolio pre-associated with your unit content artefacts.
1. Click Course results from the Add button.
2. If you have more than one role in the system, select the role you want to import unit results for from the Enrolled As drop-down list. Click the name of the unit you want to import results from.
3. Select the items you want to import by selecting the check box beside the course results or competencies, then click Next.
4. Enter a Name and Description for each item. Add any Tags you want the artefact to have.
5. Click Save.
Note: The system takes a few minutes to generate the results into your ePortfolio.
Your Grades/Competencies for the desired unit is now created in your ePortfolio.
Tip: Click the Apply Tags to All Artefacts button to add a set of tags to all items on the page.
Step Six: Record Audio
You can record audio directly within My ePortfolio, rather than pre-recording audio on your computer and uploading it as a file.
1. Click Audio Recording from the Add button.
2. If you see an Adobe Flash Player Settings pop up message, select the Allow and Remember radio buttons then click on Close.
3. Ensure your microphone is set up correctly and click Record.
4.Click Play to listen to your recording.
5.Click Next.
6.Give the file a Name and Description.
7.Add any tags you want the artefact to have.
8.Click Save.
Your audio file is now uploaded on your ePortfolio.
Tip: Alternatively, if you have an audio file you would like to upload, you can do so by using the Upload a File option above.
See Also
Sharing ePortfolio artefacts with individuals
Creating an ePortfolio Presentation
Importing a zip file of artefacts to your ePortfolio
Exporting a ZIP file of Artefacts from ePortfolio
Further Support
Contact us This email address is being protected from spambots. You need JavaScript enabled to view it., for information and resources on technology-enhanced learning, or visit VUCollaborateHelp.vu.edu.au.
Contact ITS Service Desk on (03) 9919 2777 or via self-service servicedesk.vu.edu.au for technical support.