Virtual Classrooms

Enable remote learning and encourage student participation in a fully online environment.

Using Breakout Rooms in Zoom

Beakout rooms are sessions that allow you to split students into separate groups and rooms (up to 100 breakout rooms can be created) for collaboration, discussion, and group work. As a host or co-host, you can create and manage and move between breakout rooms. Breakout room participants have the same permissions as in the main room, so make sure you set those up before sending people to a breakout room.


In this guide, the below steps will break apart how to set up and use breakout rooms in Zoom: 


Zoom Video on Using Breakout Rooms


Review Settings


To review and update breakout room settings:

1. Access victoriauniversity.zoom.us and sign-in and login with your Staff ID and Password.

2. In the navigation menu, select Settings (1), then select or scroll down to In Meeting (Advanced).

3. Check that Breakout room - Meetings is toggled on (2), then review all settings (3).
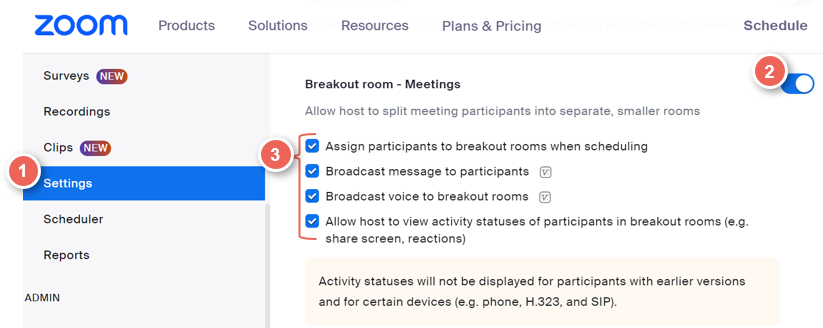
review break out room settings

Selecting allow host to view activity status of participants in breakout rooms, will allow you to see student activity, including sharing screens, and active mic or camera.

Breakout Room with the Updated Symbols


Breakout Rooms


Create breakout rooms

1. When in a meeting, as a host or co-hosts, on the meeting tool bar, select Breakout rooms.

Select the Breakout Room Button on the Zoom Toolbar

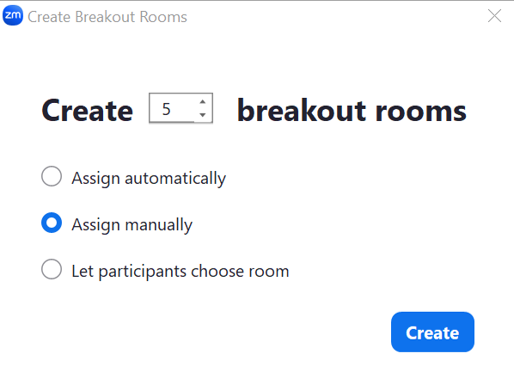
2. Select the number of rooms to be created, and the assignment method, either automatically, manually or let participants choose.
In this example we will create 5 breakout roomsassign manually, then click Create.

select number and assignment method

Assign students to groups

3. For each room, select Assign, then tick to select participants.

4. When all participants have been assigned to rooms, click on Open All Rooms to invite your participants to join in.
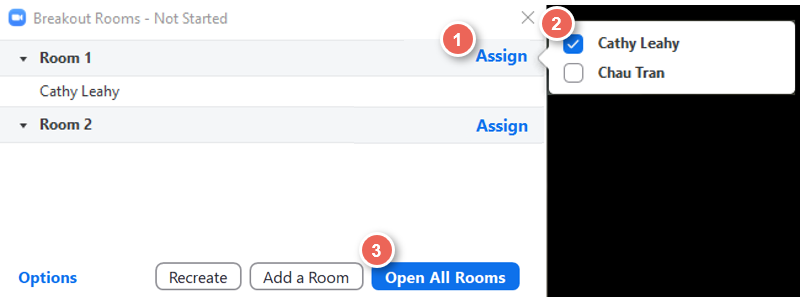
assign students to rooms

Breakout rooms 

Running room tips:

  • If a student has not joined a session, they will be listed with (not joined) next to their names.
  • To send a message to all rooms, select Broadcast Message to All, enter your message and then click Broadcast. The message will be displayed for 3-5 seconds.
  • To visit a room, select join.
  • If students Ask for Help, a help request message will be dispalyed. Click Join Breakout Room to enter the room.

5. Once participants have completed their activities or you wish to invite everyone back into the main session room, select Close All Rooms so they can come back to the main room.  Participants will be given 60 seconds (or less if you choose) to leave the breakout room and join the main session before the breakout rooms are closed.
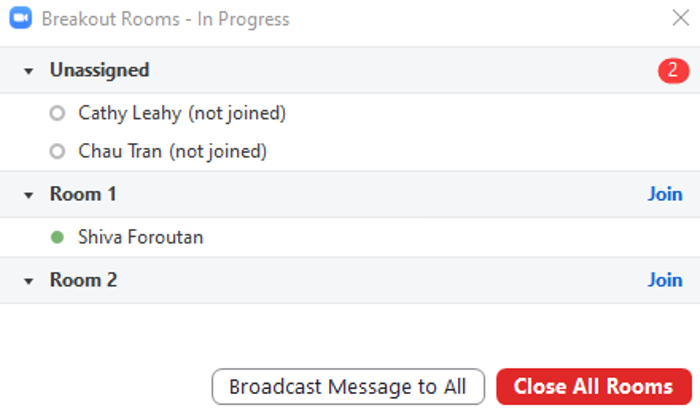
open rooms


Note:

  • Some students may join your class as guests (i.e. not a VU Student Zoom account), so you may find that some students do not automatically get assigned to a breakout room. You will need to input them manually. 
  • If a student arrives late to class and Breakout Room Sessions have already begun, Zoom does not automatically send them to their assigned Breakout Room. Instead, the host must assign the students manually to their Breakout Rooms. To learn about this, read the manually assigning participants section.


Pre-Assigning Breakout Room in Zoom (Authenticated Users)


3.1 Download a Gradebook Student List as a CSV File

The first step needed when creating Pre-Assigned Breakout Groups in Zoom will require you to download your grade book student list from VU Collaborate.

1. Log into VU Collaborate and hop into your current Delivery Space.

2. Select Assessments on the top toolbar and then Grades.

Select Assessments in the Navbar to activate the dropdown box and select Grades

3. Select Enter Grades on the top left-hand side of the screen to enter the Gradebook.

Select Enter Grades to enter the Gradebook

4. Once in the Gradebook, select Export located near the top left-hand side of the page.

In the Gradebook select Export

5. Make sure to copy the following settings down below.

Select All Users under Export Grade Items if there is only one group within the Delivery Space.

Select the following settings

If there are multiple groups in the Delivery Space and you want to select your class group, change All users to Groups and then select Apply.

Select Groups and then Apply

Then select the new dropdown menu and choose your class from the list. Then select Apply.

Select the new dropdown and choose you class group then select apply

6. Select the tick box Email within User Details.

Select the following settings tick email

7. Deselect the top tick box to detach all Grade Items from the export.

De select all Grade Items by removing the tick from the tick all button

8. Then select Export to CSV to finalise the export.

Select Export to CSV to finalise the export

9. The following dialogue box will appear once finalised. Select Download once the ( Gradebook Download File ) is ready.

10. Your computer should then automatically download the document; save ( Gradebook Download File ) to your desktop.

Please refer to the Zoom Essentials Help Guide, Accessing Zoom step 2.1, to learn how to log into your VU Zoom Staff Account correctly.

11. Log in to the Zoom Web Portal following step 2.1 in the Zoom Essentials Help Guide.

12. Once within the Zoom Web Portal, on the left-hand side, select Meetings.

Select Meetings

13. On the right-hand side, select Schedule a Meeting.

Select Schedule a Meeting

14. Scroll down the page and select Show to open further options.

Scroll down and then click Show

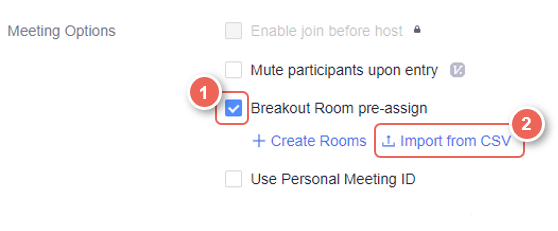
15. Scroll down the page until you see Breakout Room pre-assign, tick this option and then select Import from CSV.

Scroll down and tick Breakout Room pre assign then select Import from CSV

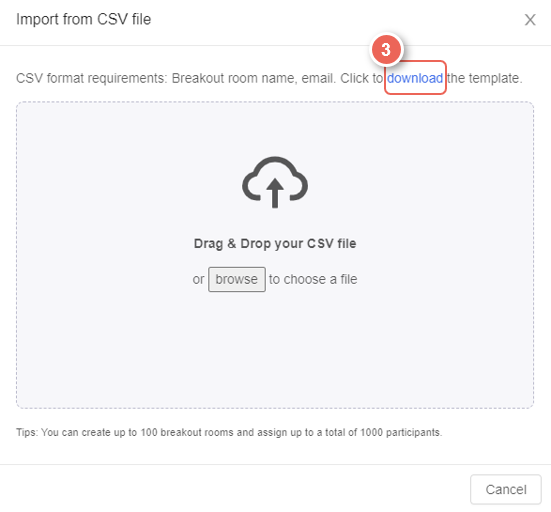
16. A pop up will appear; select download within the sentence above the Drag & Drop area. This will allow you to download and save a helpful template.

We recommend saving the CSV template document onto your computer device or USB storage and making a copy for future uses.

Select Download to get the CSV Template File

You may now close the Zoom Web Portal and the creation of a new Zoom Session.


3.2 Editing the CSV File Template

1. Open the CSV File now located on your computer device. This file will open within Excel.

Open the CSV Template File

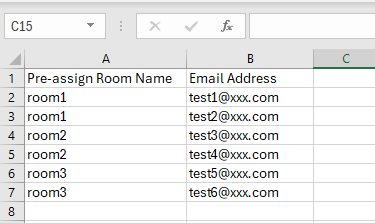
The CSV template will look like the image below once opened:

The CSV Template will look like this

2. Now, open the Gradebook Download File with your students' emails. This file should also open within Excel.

Student Email Export File 

The Gradebook Download File will look like the image below once opened:

Student Emails Excel Exemplar

3. Highlight all of your students' emails and copy them by either right-clicking your mouse and selecting Copy or by using the shortcut keys on your keyboard ( CTRL + C ).

Copy Student EmailsCopy emails

4. Head back to the CSV template and replace the fake test emails with your students' emails.

You can do this by highlighting the test emails, and then you may either right click your mouse and select Paste or use the shortcut keys on your keyboard ( CTRL + V ).

Paste and replace test emailsCopy Student Emails into CSV File

The following steps will showcase how to create pre-assigned breakout groups.

Now that you have copied your students' emails into the CSV template, you may split them into their breakout groups for your next session.

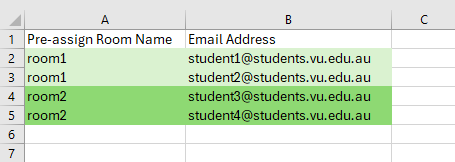
5. To split students into separate breakout rooms, assign them to a room by giving them a pre-assign Room Name. For example, if you want groups of three, you will place three students into room1, room2 and room3.

You can make as many rooms as you like, and you may colour code the rooms to make it easier to see who is in what pre-assigned breakout room.

Make Groups in CSV File

6. Once all students have been assigned, Save the CSV File Template.


3.3 Uploading the CSV File to a Scheduled Zoom Meeting

In the case of uploading pre-assigned breakout rooms, you will first need to have scheduled meetings available within the Zoom Web Portal.

Please refer to the Zoom Essentials Help Guide, Accessing Zoom step 2.1, to learn how to log into your VU Zoom Staff Account correctly.

1. Log in to the Zoom Web Portal following step 2.1 in the Zoom Essentials Help Guide.

2. Once within the Zoom Web Portal, on the left-hand side, select Meetings.

Select Meetings

3. In the Upcoming meeting section, hover over the session you wish to add pre-assigned breakout groups and select Edit.

Over over your meeting and select Edit

4. Scroll down the page and select Show to open further options.

Scroll down and then click Show

5. Scroll down the page until you see Breakout Room pre-assign, tick this option and select Import from CSV.

Scroll down and tick Breakout Room pre assign then select Import from CSV

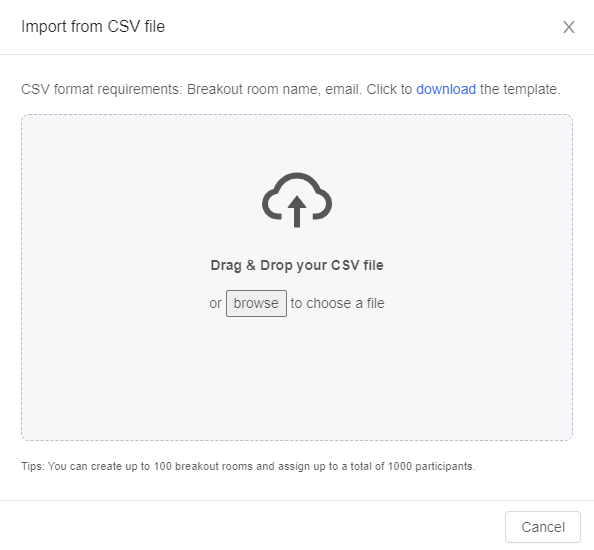
6. Drop the CSV template file you updated in the space pictured below.

Place CSV File Here

7. It will then upload to the scheduled meeting and select Save.


3.4 Activate the Authenticated User Setting

You will need to ensure that the following setting is activated in your profile on the Zoom Web Portal.

Please refer to the Zoom Essentials Help Guide, Accessing Zoom step 2.1, to learn how to log into your VU Zoom Staff Account correctly.

1. Log in to the Zoom Web Portal following step 2.1 in the Zoom Essentials Help Guide.

2. Once within the Zoom Web Portal, select Settings and then Security underneath the Meeting subheading on the left-hand side.

Select Settings and then Security

3. Scroll down and ensure that the Only Authenticated Users Can Join Meetings from Web Client is activated.

If you pre-assign breakout rooms, your students will be required to log into Zoom via the single sign-on process through VU Collaborate.   

Authenticated User Setting

Please note if you intend on running meetings in the future with individuals external to VU, this setting will need to be deactivated.


3.5 Importing Meeting to VU Collaborate Space from Zoom Web Profile

For your students to attend your Zoom classroom, you will need to ensure that the Zoom Web Portal ( victoriauniversity.zoom.us ) is imported to your VU Collaborate Unit space.

1. Go to the Zoom Web Portal ( victoriauniversity.zoom.us. ) and copy the Meeting ID by highlighting the ID and right-clicking, then select Copy. Or you can use the shortcut on your keyboard (Ctrl + C).

Copy Meeting ID

2. Navigate to your Zoom Classroom section in your Delivery Space by selecting Communication in the navbar, then select Zoom Classroom.

Select Communication in the VU Collaborate navbar and then select Zoom Classroom

3. On the far right of the screen, you will see a button with three dots; select it.

4. Then select Import Meeting.

Select the three dots and then select Import Meeting

5.  Right-click with your cursor, then select Paste or use the shortcut on your keyboard (Ctrl + V) the Meeting ID that you have copied from the Zoom Web Portal as per the below image.

6. Then select Import.

Import Meeting ID

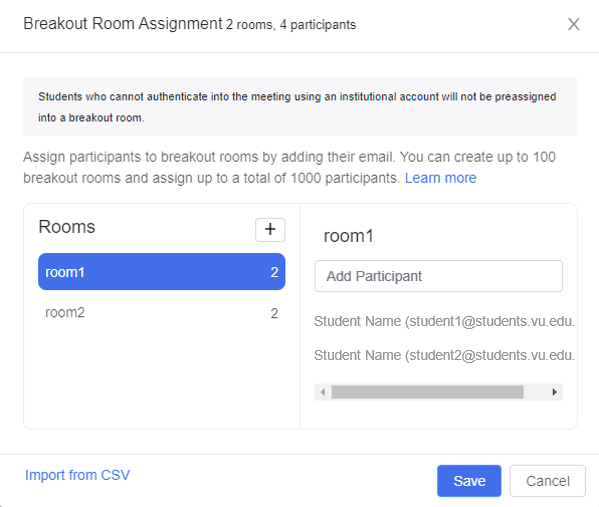
7. The meeting should then appear as below with your pre-assigned breakout rooms.  

Zoom Meeting

8. You are now ready to start your scheduled Zoom Classroom, and your pre-assigned breakout room will be set.  

9. When facilitating your classroom, select breakout rooms on the toolbar within your zoom meeting, the pre-assigned breakout rooms will appear, and all you need to do is select open breakout rooms.  


Further Support

Contact us This email address is being protected from spambots. You need JavaScript enabled to view it., for information and resources on technology-enhanced learning, or visit VUCollaborateHelp.vu.edu.au.
Contact ITS Service Desk on (03) 9919 2777 or via self-service servicedesk.vu.edu.au for technical support.


Admin Only