

Add Release Conditions for Learning Materials
Release conditions let you create a custom learning path through a learning space. You can use them to allow or prevent access to learning materials until specific criteria are met.
Where Release Conditions Can Be Applied
Release conditions can be added to the following tools to restrict access until the condition is met:
- Checklists and news items
- Content modules and topics
- Discussion forums and topics
- Intelligent Agents
- Assessment Dropbox, Quizzes, and Surveys
- Grade items
Examples
Here are some common ways to use release conditions:
- Restrict access to Module 2, until all the topics in Module 1 have been viewed
- Restrict access to a module, until the student achieves a passing grade on a quiz.
- Restrict access to a quiz, to students who belong to a specific class group (e.g. the Sydney class).
On this page
Release a Module After Passing a Quiz
This guide will walk you through adding a release condition to the Week 2 module, that can only be viewed after achieving a pass on Quiz Test 1.
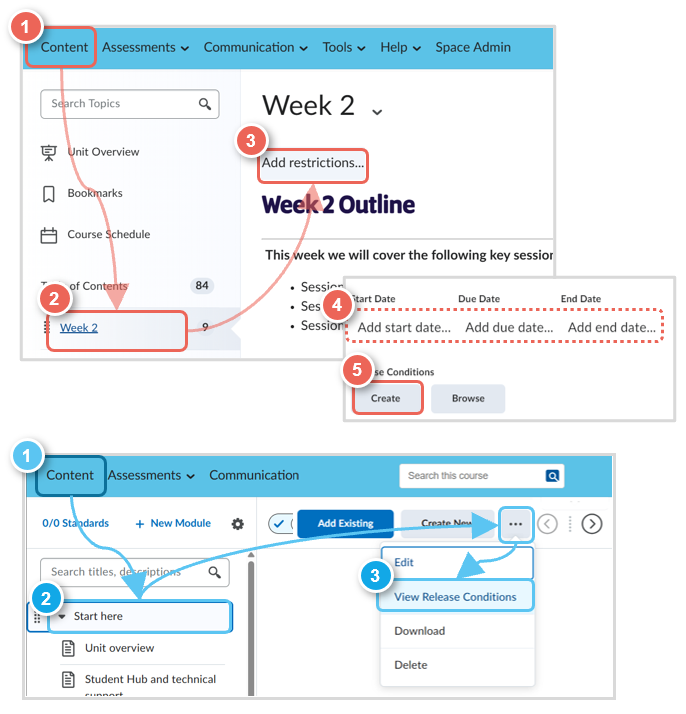
Step One: Accessing Release Conditions
1. From the learning space main menu, select Content.
2. Locate your Module (e.g. Week 2 or Start here).
3. Select Add Restrictions,
(with the new template, select View Release Conditions from options).
4. (Optional) Add date controls: select Add start date to set when the item becomes available, Add due date to set the due date, or Add end date to set the final date the item is visible.
5. Below the date controls, you will see two options for release conditions — Create a new condition, or Browse to reuse a previously created one.
Reusing an existing condition
Select Browse to open a list of conditions you have previously created. Use the All Tools filter to narrow the list. Tick the box next to the condition you want to reuse, then select Attach.
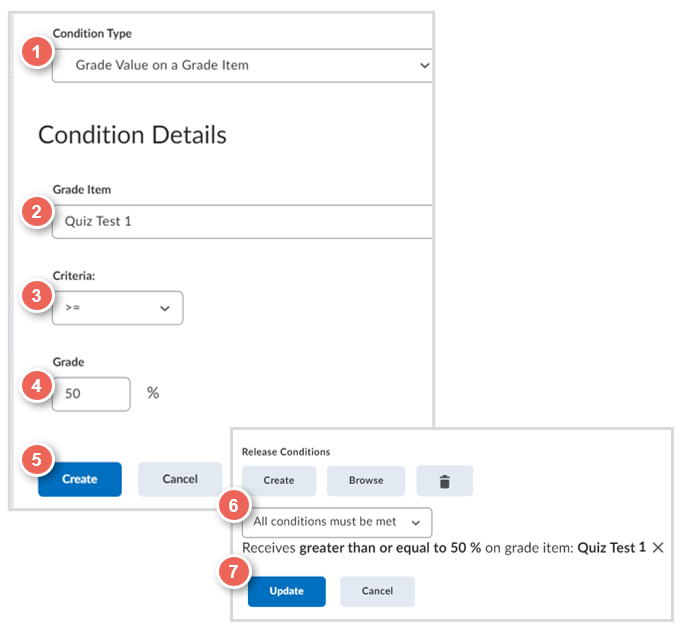
Step Two: Setting Release Conditions
1. From the Condition Type context menu, select Grade Value on Grade Item.
2. From the Grade Item context menu, select Quiz Test 1
3. In Criteria, select greater than or equal.
4. In Grade enter 50%.
5. Select Create when you are done.
6. Keep the All conditions must be met option selected. If you have added multiple conditions, you can choose whether all or any of them must be met. Here you can also check the condition listed. If you need to remove it, select the X icon next to it.
7. Select Update to save your conditions.
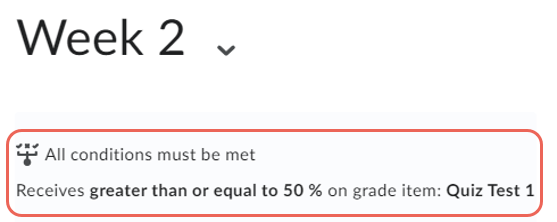
Review Release Conditions
Your release conditions are now saved. You can return at any time to edit, remove, or add conditions.
Important: Release conditions cannot be reset once met
Once a student meets a release condition, it is permanently cleared for that student — even if their circumstances change.
Example: If a student earns 72% on a quiz (meeting the 60% threshold) and then has their grade adjusted down to 55%, they will still retain access to the restricted content. The condition was met at the time, and cannot be undone.
Release a news item to only one class
You can use a release condition to make a news item visible only to students who belong to a specific class group - for example, students enrolled in the Sydney campus, class 1.
This uses the Group Enrolment condition type, which checks whether a student belongs to a designated group before granting access.
To set this up, follow the steps in Creating Release Conditions and apply the following settings:
Release Condition
- Content: News item
- Condition type: Group enrolment
- Condition details: Group, VU Sydney Class01-Group 01