Padlet

Collaborate better with beautiful boards, documents, and webpages that are easy to read and fun to contribute to.

Using Padlet


Victoria University now has a licence for Padlet. 
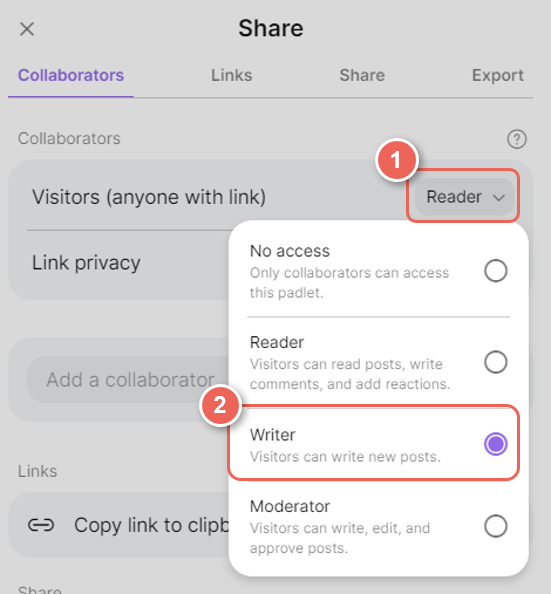
Padlet is an online tool that allows students to share text, images, links, videos, and more. It can be shared with your students or colleagues by embedding the padlet on a VU Collaborate page, scanning a QR code, or providing them with the unique Padlet link. 


Related guides

See the Gallery for some great examples and inspiration of how you can use Padlet in your learning space.

Request a Padlet account

Staff Only
To get access to a VU Padlet account, send your request with your eNumber to This email address is being protected from spambots. You need JavaScript enabled to view it.

Students

Create a free account (with up to 3 Padlet boards) at https://www.padlet.com


Step One: Access Padlet


1. Go to Padlet at Victoria University and log in with your provided login details.

2. When you sign in, the first thing you see is the Dashboard.

If you have an existing Padlet account, you will be given the option to import previously created Padlet.com into your VU Collaborate Padlet account. 
See Import my personal padlets to a Backpack account

vp padlet homepage

3. Click Make a Padlet, then click on Blank board tile to create a new Padlet board.
Or select a template from a range of use cases.

make a padlet button  create a blank board

4. Enter your board title, ideally can be the unit name or unit code and topic (i.e.: ABC1234 - Introduction to...).

enter title

5. Select a format (1) and turn on/off sections (2).

Padlet offers several kinds of options as shown in the image below which can be used for different learning tasks. 

  • Wall - similar to Pinterest, allows you to post texts, images or videos.
  • Stream - looks like a blog where only one post is seen at a time in order. 
  • Timeline - displays in a horizontal list of items.
  • Grid - displays items in a row and therefore looks better when the items are of similar size. 
  • Canvas - can be used to develop mind maps to show inter-relationships. 
  • Map - allows posts to be added as a point on a map.

select padlet format


Step Two: Customise your Padlet board


Customise the look and feel of your board via Settings.

1. Open Padlet Settings by clicking on the gear icon on the right screen.

padlet access settings

2. Scroll through the list to modify and customise your board:

  • Heading:
    • Title - ideally be the unit name or unit code
    • Description - insert the question or activity prompts.
  • Appearance (background, theme, etc)
  • Layout (group posts and sort posts)
  • Engagement (comments and reactions)
  • Content (moderation)
  • Advanced

padlet setting options 

3. Padlet settings will be saved automatically by the system.
Once done, click on the X (close) icon to exit the settings panel.

vp close settings panel


Step Three: Add Collaborators


Next, to ensure other users (students or colleagues) can access and post on your Padlet, you would need to configure padlet Privacy settings.

1. To access the Privacy setting, click on the Share option on the top right.

vp open share settings

2. Type to search for staff using their names/emails/staff ID in the Add a collaborator field (Staff Only).
Then, adjust any permissions if needed.

add collaborator text field


Step Four: Share your Board


Boards created in Padlet can be exported in several ways, including as a PDF, an image, a spreadsheet, or printed out. Your Padlet can also be shared by its unique URL, sent via email, or embedded into your unit space.

Some commonly used are:

Embed into your unit space

To embed the code into an HTML page in your learning space, first, you will have to copy the embed code from Padlet.

1. In your Padlet, click Share

vp open share settings smaller

2. Before sharing your board, ensure your Padlet is set as writable (Writer (1)) and Secret (2) (only viewable by embed code or link) as below.

If you choose the "Organisation wide" option, it's restricted to users in your organization. Visitors not in your organization will be denied access, in this case, students won't be able to access them as they're not required to have accounts).

padlet privacy settings

3. Select Embed in your blog or your website, then select Copy padlet embed code.

access embed code  copy padlet embed code  

4. Return to your Unit Space, and add a new document or edit an existing document HMTL page.
In the HTML editor, click on the insert stuff icon, then select Enter Embed Code.

insert stuff icon in the HTML editor   select enter embed code

5. Paste your embed code into the text box, then click Next.

paste your embed code into the text box, then click insert

6. Click Insert.
Then click Save and Close, to confirm your changes.

save and close button 

Present your board as a SlideShow

To display your Padlet board as presentation slides, simply click on the Open Slideshow option from the top-right menu.

access slideshow

A new tab will open and show your board in slideshow format. The look and format of the presentation will be the same as the appearance settings in current your board.

For more information, you can also refer to the Padlet Slideshow guide, by Padlet team.


Manage Padlet boards from Block to Block

At the start of each Block, it is the unit convenor's responsibility to make sure that all content and activities in the unit site are up to date, this includes Padlets. 

In general, Padlets should be changed/updated in the delivery space, and there are three options to help you accomplish that. 


Answer common Padlet questions
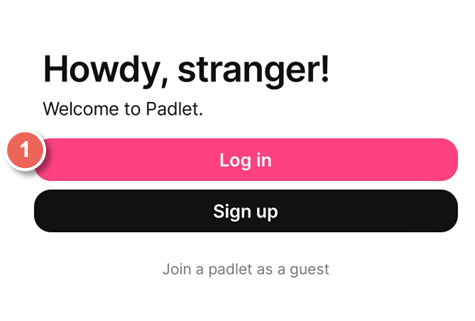
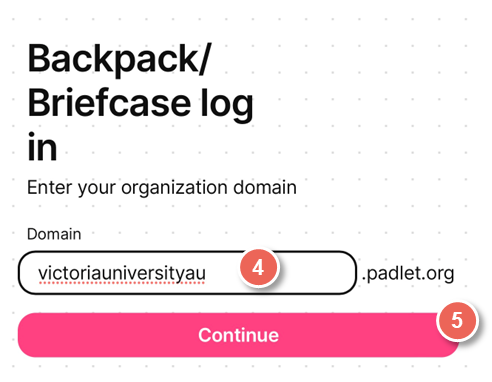
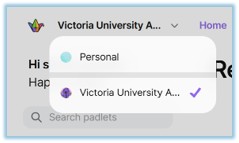
Click on each tile below for more details and instructions.


Further Support

Contact us This email address is being protected from spambots. You need JavaScript enabled to view it., for information and resources on technology-enhanced learning, or visit VUCollaborateHelp.vu.edu.au.
Contact ITS Service Desk on (03) 9919 2777 or via self-service servicedesk.vu.edu.au for technical support.

Admin Only