

How to manage your sites in the Dashboard
The Dashboard is your site's control centre, here you can navigate between sites, change settings from functionality to look and feel, and add content to your site.
View the Dashboard:
Getting Started
- Navigate between sites
- Toggle between site dashboard and site view
- Updated your Avatar (profile picture)
- Edit your Site Title and Tagline in the settings
Dashboard
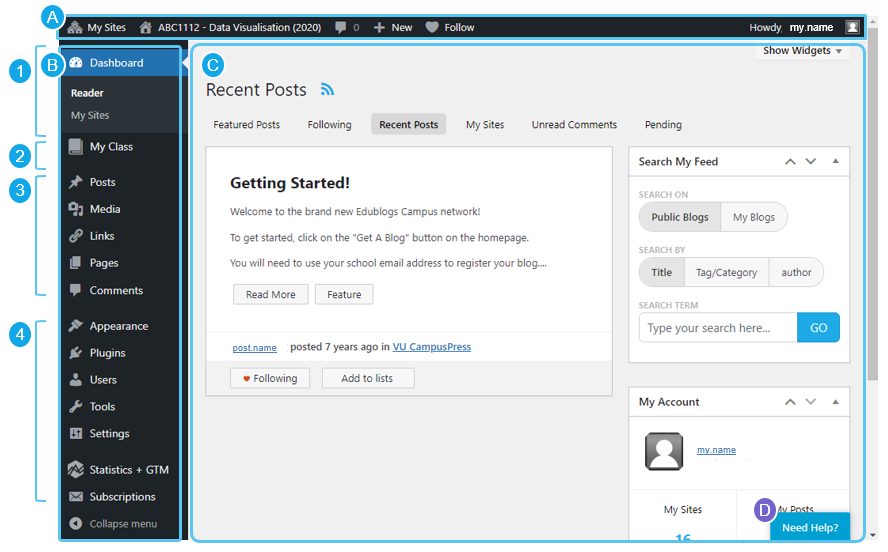
Dashboard Overview
The Dashboard is composed of three main parts:
- (A) Admin Bar - navigate between sites, access quick edit options and profile details
- (B) Main Navigation
- (1) Dashboard - Reader and My Site views
- (2) My Class
- (3) Content Management - edit Posts, Media, Links, Pages and Comments
- (4) Site Administration - edit Appearance, add Users and Plugins and Manage with Tools and Settings
- (C) Main Area
- (D) Need Help - expand the help panel to search for guides or view suggested help guides
Main Navigation
- (1) Dashboard - Reader and My Site views
- (2) My Class - Access and manage your class sites
- (2) Content Management -
- Posts - post main content, reflections and more, see Post Overview by Campus Press
- Media - upload your images, videos and documents to use in your Post and Pages, see Managing Files In Your Media Library by Campus Press
- Links - display links in the sidebar, see Link Widget by Campus Press
- Pages - pages for less frequently updated content, see Pages Overview by Campus Press
- Comments - see Comments Overview by Campus Press
- (3) Site Administration - edit Appearance, add Users and Plugins and Manage with Tools and Settings
Admin Bar
Your sites Admin Bar
- (A) My Sites – lists all the sites you have a membership to
- (B) Your site name – click to toggle between the dashboard and site view, or select options from the drop-down menu
- (C) Comments – view and search comments
- (D) + New – add new posts and other items
- (E) Follow – follow this site
- (F) Profile image – edit your profile image or logout

For more information on the Dashboard and Admin Bar see Dashboard by CampusPress.
Getting started
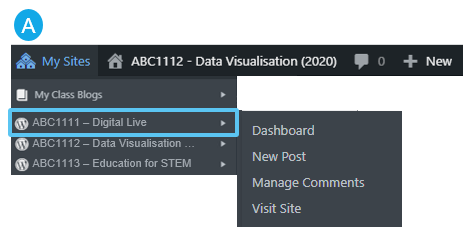
Navigate between sites
From the Admin Bar navigate between your sites and have quick access to create new posts, and manage comments
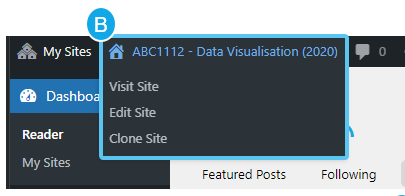
Toggle between site dashboard and site view
You can navigate between your site view and dashboard from your (B) current site menu.
Note this menu changes depending on your current view.
Updated your Avatar (profile picture)
Update your Avatar image, by going to the main menu:
- Select Users, then Your Avatar
- Click (1) Choose File
- Locate and select a profile image on your computer, then click Open
- Click (2) Upload
- Expand or move the crop selection as needed
- Click Crop Image
![]()
Your new profile image will now be shown on your posts.
See Upload Avatar (profile picture) by Campus Press
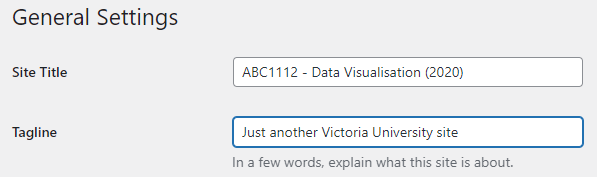
Edit your Site Title and Tagline in the settings
Your Site Title and Tagline are at the top of all your pages.

You can go and changes both of these anytime in the settings. To change the settings
- In the main menu go to Settings, then General
- Enter your new Site Title and Tagline
- Then click Save Changes
See Change Title and Tagline by Campus Press